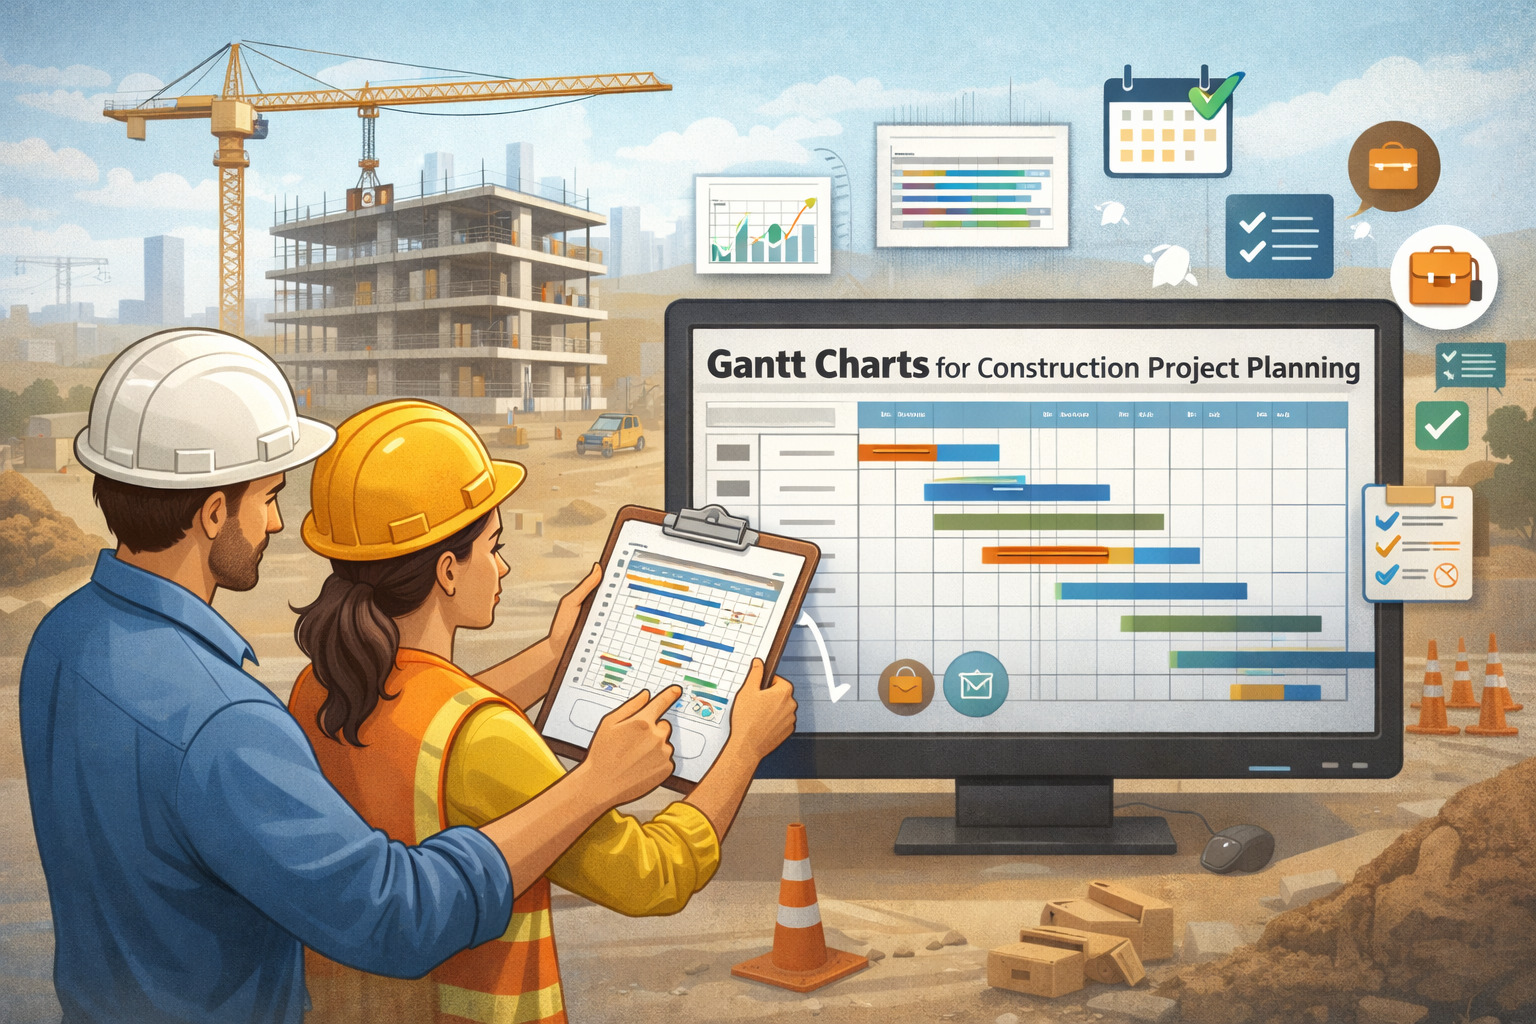
Using Gantt Charts for Construction Project Planning (2026 Scheduling Guide)
If you’re using Gantt charts for construction project planning, you’re doing something smart: you’re turning a messy pile of scope, dates, and trade handoffs into a visual plan everyone can understand.
A good Gantt chart won’t pour concrete or hang drywall—but it will make sure the right work happens in the right order, with fewer surprises, fewer “we’re waiting on them” standstills, and clearer accountability.
This construction project planning with Gantt charts guide is written for the field: general contractors, project managers, subcontractors, owners, and small firms that need a reliable schedule without overcomplicating things.
You’ll learn how to build a schedule that reflects real construction sequencing, inspections, procurement lead times, and subcontractor coordination. You’ll also learn when Gantt charts in construction management are enough—and when you need deeper CPM discipline.
Think of this as your Gantt chart construction scheduling guide for 2026: practical steps, checklists, and templates you can reuse job after job.
Why A Gantt Chart Works So Well In Construction

A Gantt chart is a timeline that shows tasks on the left and time on the right, with bars that represent planned durations.
For construction, that “bars on a timeline” format is powerful because construction is fundamentally about sequence and handoffs: one crew finishes so another can start, inspections gate progress, and materials show up on a lead time that doesn’t care about your promised completion date.
In the field, people don’t want scheduling theory—they want answers:
- “When can framing start?”
- “What’s the inspection date?”
- “What’s holding up drywall?”
- “If the owner adds scope, what moves?”
A well-built Gantt chart makes those answers visible. It also helps you manage the two schedules every job has:
- The schedule you planned (your baseline schedule)
- The schedule you’re living (your live schedule)
In 2026, schedules are even more sensitive to procurement volatility, inspection backlogs, and resource constraints. The Gantt chart gives you a single place to show how those realities affect finish dates, milestones and deliverables, and trade start windows.
Pro Tip: A schedule isn’t “real” until it includes permit/inspection gates and long-lead procurement. If those aren’t on the chart, you’re not scheduling—you’re guessing.
What a Gantt Chart is (and what it is not)
A Gantt chart is a visual schedule—not a contract, not a promise, and not a magic wand. It is a planning and control tool that represents:
- Task names and durations
- Start and finish dates
- Task dependencies (what must happen before/after)
- Key milestones (permit approval, foundation pour, inspections, substantial completion)
- Progress tracking (percent complete, actual dates)
What it’s not:
- It’s not automatically a CPM schedule (unless you set it up that way)
- It’s not accurate if it isn’t updated
- It’s not useful if it’s either too detailed (micromanagement) or too vague (no control)
In construction, the sweet spot is a schedule that is:
- Detailed enough to control trade handoffs and gates
- Simple enough for weekly updates and coordination meetings
That’s why Gantt charts are common in construction management: they communicate clearly to owners, trades, and field teams—even when people aren’t scheduling experts.
Pro Tip: If your schedule can’t fit on one screen (or one printed page) at the phase level, you probably need a summary view and a detailed view—not one monster schedule.
Common Construction Phases And Tasks To Include On A Gantt Chart

You can’t schedule what you haven’t defined. Start by organizing your tasks into phases that match how work actually flows on site. Even if your job is small, a phased structure prevents missed steps like approvals, mobilization, and closeout.
Below is a practical starting list. You’ll tailor it based on project type, delivery method, and site constraints.
Table 1: Common construction phases and typical tasks for a Gantt chart
| Phase | Typical tasks to include (examples) |
|---|---|
| Preconstruction | Scope review, site walk, survey, geotech review, logistics plan, safety plan, initial procurement list |
| Design/Engineering Support | Submittal register, shop drawings, coordination reviews, owner selections, value engineering reviews |
| Permits & Approvals | Permit application, plan check cycles, utility coordination, preconstruction meetings, permit issuance milestone |
| Procurement | Long-lead material release, fabrication window, delivery dates, storage/handling plan |
| Sitework | Mobilization, temp fencing, erosion control, demo (if any), rough grading, utility trenching, inspections |
| Foundations | Formwork, rebar, embeds, foundation pour milestone, cure time, backfill, foundation inspection |
| Structure/Framing | Structural steel or framing, sheathing, rough openings, framing inspection |
| Building Envelope | Roofing, windows/doors, waterproofing, exterior finishes, envelope punch |
| MEP Rough-In | Underground rough, rough plumbing, rough electrical, rough HVAC, above-ceiling coordination, rough inspections |
| Interiors | Insulation, drywall hang/tape, prime/paint, ceilings, flooring, millwork, interior doors/hardware |
| MEP Trim & Start-Up | Fixtures, devices, startup, testing/balancing, commissioning activities (as applicable) |
| Final & Closeout | Final inspections, punch list scheduling, training, O&M manuals, substantial completion milestone, turnover |
This table is intentionally “field ready.” It gives you a structure for construction sequencing while leaving room for your specifics.
Pro Tip: Put inspections as separate tasks (not notes). Inspections are schedule gates. If they’re not tasks, they won’t get planned—or chased.
When Gantt charts are enough vs when you need deeper CPM scheduling

Gantt charts are enough when your project can be controlled by a clear phase plan and trade handoffs, and when the risk of complex logic conflicts is low. You can run excellent jobs with a solid Gantt chart—especially for small-to-mid projects—if you manage dependencies, procurement, inspections, and updates with discipline.
Gantt is usually enough when:
- The project has limited parallel work and straightforward sequencing
- There are few critical interfaces between systems
- The owner wants clear milestones and straightforward reporting
- Your team needs a schedule that’s easy to update weekly
- You’re managing a small number of subcontractors
You should go deeper into CPM when:
- The job has many parallel paths (multiple areas, floors, or buildings)
- Time impacts are contentious (frequent change orders and claims risk)
- You need formal analysis of float/slack time and schedule variance
- You’re coordinating heavy MEP density with tight handoffs
- The contract or stakeholders expect CPM logic and formal updates
This is where critical path method (CPM) basics matter. CPM isn’t “fancier Gantt.” It’s a method for calculating which tasks drive the finish date (the critical path) and how much float exists on other tasks. A Gantt chart can show CPM, but it doesn’t automatically calculate it unless your tool supports it and your logic is built correctly.
Pro Tip: If a project has repeated scheduled debates (“Who caused the delay?”), treat CPM discipline as risk management—not bureaucracy.
CPM basics for field teams (no jargon, just what you need)
Let’s keep CPM simple. CPM is a way to understand:
- Which tasks must happen on time or the project finish moves
- Which tasks have float/slack time (they can slip a bit without affecting finish)
- Where to focus supervision and coordination
Here’s the basic idea:
- You create tasks and dependencies (the logic)
- The schedule calculates earliest and latest dates
- Tasks with zero float are on the critical path (delay them, and you delay the project)
Why it matters in the field:
- Your “critical” work might not be the loudest work
- A material delivery task can be more critical than a labor task
- An inspection can be critical even if it takes 30 minutes
CPM also helps you talk clearly about schedule variance:
- “We’re 5 days behind the baseline on rough-in inspection”
- “We’re holding float on paint, but flooring is now critical”
You don’t need to be a scheduling engineer to use CPM thinking. You just need a habit: always ask, “If this slips, what does it push?”
Pro Tip: Add a simple “Impact” note to delay items: Impacts drywall start, impacts ceiling close, impacts final inspection. That’s CPM thinking in plain language.
Task dependencies explained simply (FS/SS/FF/SF) with construction examples
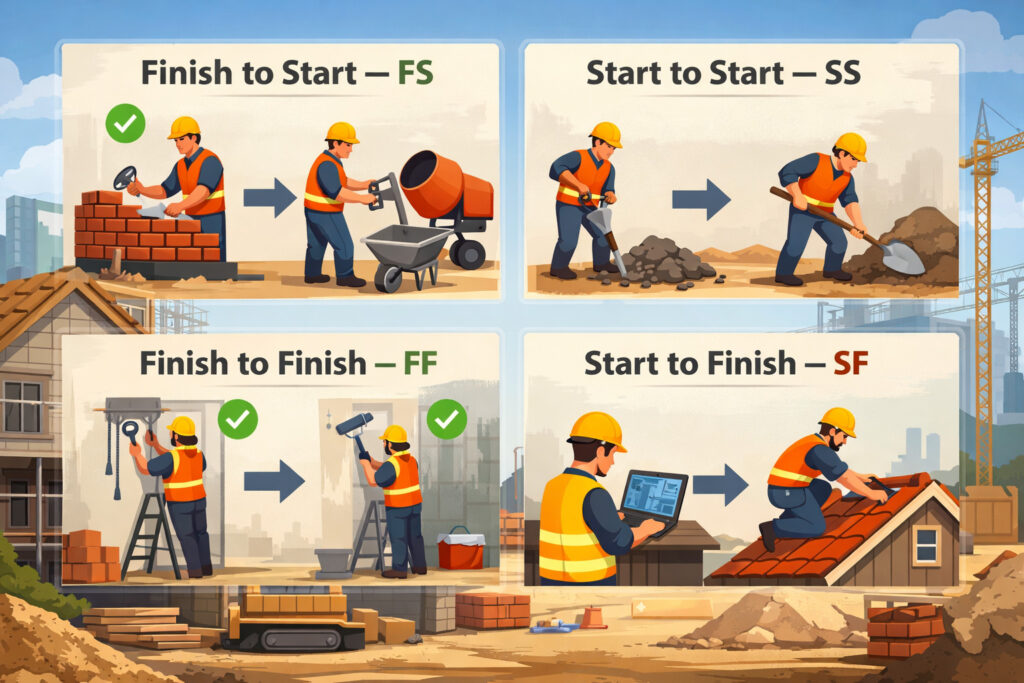
Dependencies are the rules that connect tasks. If you miss dependencies, your Gantt chart becomes a pretty picture that doesn’t reflect reality. You’ll hear four common dependency types:
- FS (Finish-to-Start): Task B starts after Task A finishes
- SS (Start-to-Start): Task B starts after Task A starts
- FF (Finish-to-Finish): Task B finishes after Task A finishes
- SF (Start-to-Finish): Rare in construction; Task B finishes after Task A starts
Most construction schedules rely heavily on FS, with occasional SS and FF for overlapping work.
Table 2: Dependency types with construction examples
| Dependency | What it means (plain language) | Construction example |
|---|---|---|
| Finish-to-Start (FS) | “This finishes before that starts.” | Framing FS rough MEP: rough-in starts after framing is complete in the area |
| Start-to-Start (SS) | “This starts when that starts (or shortly after).” | Rough plumbing SS rough electrical: both begin once framing starts in a zone |
| Finish-to-Finish (FF) | “These finish together (or one can’t finish until the other finishes).” | Ceiling grid FF above-ceiling inspections: ceiling close can’t finish until inspections are complete |
| Start-to-Finish (SF) | “One can’t finish until the other starts.” (rare) | Temp power removal SF permanent power energization: temp power ends after permanent power begins |
When you add dependencies, you reduce “floating tasks” that can drift without anyone noticing. Dependencies also expose missing scope—like when the schedule shows “drywall” but forgets “insulation inspection” right before it.
Pro Tip: If you’re unsure, default to FS. Most trade handoffs are FS. Use SS only when you’re confident the overlap is real and safe.
Step-by-step: How to build a Gantt chart construction schedule (from scope to baseline)
This section is the heart of construction project planning with Gantt charts. If you follow these steps, you’ll produce a schedule that’s realistic, controllable, and easy to communicate.
Step 1: Define scope and build a simple WBS
Start with the scope documents you have: drawings, specifications, proposal, and any owner requirements. Then build a Work Breakdown Structure (WBS)—a structured way to organize work. Don’t overthink it. Your WBS can be:
- Phase (sitework, foundation, framing, MEP, interiors, closeout)
- Area (building A, building B, level 1, level 2)
- Trade (civil, structural, mechanical, electrical)
A practical approach is Phase + Area:
- Sitework (overall)
- Foundation (overall)
- Framing (Area 1 / Area 2)
- MEP Rough (Area 1 / Area 2)
- Interiors (Area 1 / Area 2)
- Closeout (overall)
This matters because it becomes your schedule backbone. When scope changes, you’ll know where to insert tasks. When you report progress, you can report by WBS.
Pro Tip: Your WBS should match how you run the job. If the superintendent thinks in “Zones,” schedule in zones.
Step 2: List tasks by phase (field-level, not microscopic)
For each WBS section, list tasks that represent real work packages. Good tasks are:
- Measurable (you can tell if it’s done)
- Assignable (a trade owns it)
- Sequenced (it has clear predecessors/successors)
Avoid tasks like “Work ongoing” or “Continue progress.” Also avoid turning your schedule into a to-do list with 400 items unless the job truly needs it.
A balanced task list might include:
- Mobilize and temp facilities
- Layout and excavation
- Underground utilities + inspection
- Form/rebar/embeds
- Foundation pour + cure
- Backfill and slab prep
- Framing + framing inspection
- MEP rough-in + rough inspections
- Insulation + inspection
- Drywall hang/tape
- Prime/paint
- Flooring
- MEP trim
- Final inspections
- Punch list
- Turnover
Pro Tip: If a task lasts more than two weeks, consider breaking it into zones or measurable segments.
Step 3: Estimate durations with realistic buffers
Duration estimating is where many schedules fall apart. In the real world, durations are affected by:
- Crew size and productivity
- Access and staging
- Inspections and re-inspections
- Material availability
- Weather and site conditions
- Learning curve with new subs or complex details
When estimating, use three numbers in your head:
- Best case (if everything goes right)
- Likely case (normal conditions)
- Bad case (common disruptions)
Then schedule close to the likely case and add buffers where risk is real—especially around procurement and inspections.
Pro Tip: Don’t hide risk by using optimistic durations. Put risk where it belongs: buffers, contingency, and risk notes.
Step 4: Set dependencies and constraints (logic first, dates second)
Once tasks exist, connect them with dependencies. Start with the obvious:
- Permit issued → mobilization
- Foundation inspection → foundation pour
- Rough MEP inspections → insulation
- Insulation inspection → drywall
- Ceiling close → above-ceiling inspection sign-off
- Final inspections → substantial completion
Constraints should be used carefully. Common constraints include:
- “Must start on” (rare; usually a mistake)
- “Start no earlier than” (useful for known dates like owner access)
- “Finish no later than” (use cautiously; can hide logic problems)
In general: build a logic-driven schedule. If you force dates everywhere, you’ll never learn what’s actually driving the timeline.
Pro Tip: If you feel tempted to force a date, ask: “Is there a real reason, or am I trying to make the schedule look better?”
Step 5: Add milestones that matter in construction
Milestones are zero-duration points that represent key events. They help communication, billing, and coordination. Useful milestones include:
- Permit approval
- Mobilization complete
- Foundation pour complete
- Framing complete (or per zone)
- Rough inspections complete
- Dry-in / weather tight
- Substantial completion
- Final completion / turnover
Milestones also help build “one-page” schedule views for owners and stakeholders.
Pro Tip: Tie milestones to deliverables: approved permits, passed inspections, accepted punch list, training complete.
Step 6: Do a resource check (labor and equipment reality)
A schedule that ignores resource loading is fragile. You don’t need fancy software to do a resource check—you need honesty:
- How many crews are available?
- Are key subs committed to your dates?
- Is equipment shared between projects?
- Are there planned shutdowns or access limits?
Identify where the schedule assumes unrealistic overlap (two big tasks requiring the same crew or same lift). Adjust sequencing or add time.
Pro Tip: If your top three subs haven’t confirmed start windows, your schedule is still a draft.
Step 7: Baseline the schedule (so you can manage it)
Once the schedule is approved for execution, take a snapshot: your baseline schedule. From that point forward, you update the live schedule weekly (or at a minimum, consistently). The baseline lets you measure:
- Progress tracking and percent complete
- Schedule variance (how far ahead/behind)
- Delay impacts and recovery plans
Without a baseline, “behind schedule” becomes an opinion.
Pro Tip: Baseline after your kickoff meeting with key trades, when commitments are real—not before.
A worked example: Simple text-based construction Gantt schedule
Below is a simplified example you can copy into a spreadsheet or scheduling tool. This is not a full CPM schedule—but it shows tasks, durations, dependencies, and milestones in a way that works for a small project.
Example assumptions
- Work week: 5 days
- Durations are in working days
- Dependencies use FS unless noted
Simple schedule (tasks, durations, dependencies, milestones)
- Permit Approval (Milestone) – 0 days – Start point
- Mobilization & Temp Facilities – 3 days – Depends on 1 (FS)
- Site Layout & Excavation – 5 days – Depends on 2 (FS)
- Underground Utilities Rough-In – 4 days – Depends on 3 (FS)
- Underground Inspection (Milestone) – 0 days – Depends on 4 (FS)
- Footings Form/Rebar – 3 days – Depends on 5 (FS)
- Footings Pour (Milestone) – 0 days – Depends on 6 (FS)
- Foundation Walls Form/Rebar/Embeds – 5 days – Depends on 7 (FS)
- Foundation Inspection (Milestone) – 0 days – Depends on 8 (FS)
- Foundation Pour – 1 day – Depends on 9 (FS)
- Cure / Strip / Prep – 3 days – Depends on 10 (FS)
- Slab Prep & Vapor Barrier – 3 days – Depends on 11 (FS)
- Slab Inspection (Milestone) – 0 days – Depends on 12 (FS)
- Slab Pour – 1 day – Depends on 13 (FS)
- Framing – 10 days – Depends on 14 (FS)
- Framing Inspection (Milestone) – 0 days – Depends on 15 (FS)
- Rough MEP (Plumbing/Elec/HVAC) – 10 days – Depends on 16 (FS)
- Rough MEP Inspections (Milestone) – 0 days – Depends on 17 (FS)
- Insulation – 2 days – Depends on 18 (FS)
- Insulation Inspection (Milestone) – 0 days – Depends on 19 (FS)
- Drywall Hang & Tape – 8 days – Depends on 20 (FS)
- Prime/Paint – 5 days – Depends on 21 (FS)
- Flooring – 4 days – Depends on 22 (FS)
- MEP Trim – 5 days – Depends on 23 (FS)
- Final Inspections (Milestone) – 0 days – Depends on 24 (FS)
- Punch List – 5 days – Depends on 25 (FS)
- Substantial Completion (Milestone) – 0 days – Depends on 26 (FS)
How to use this example:
- Add procurement lead times as tasks (see next section)
- Break “Framing” and “Rough MEP” into zones if needed
- Add owner selections (fixtures, finishes) as tasks if they affect schedule
Pro Tip: If you add only one improvement to this sample, add procurement tasks for long-lead items—then link them to install tasks.
Construction scheduling realities your Gantt chart must reflect in 2026
A schedule that ignores construction realities doesn’t fail politely—it fails loudly, in the form of downtime, stacking trades, rework, and conflict. In 2026, a field-ready schedule needs to plan around four common friction points: permits/inspections, procurement, handoffs, and unplanned disruptions.
Permits and inspections scheduling (treat them as gates)
Permits and inspections aren’t “admin work.” They are production gates. Plan for:
- Permit review cycles (including resubmittals)
- Utility coordination and site access approvals
- Inspection lead time (booking)
- Re-inspection risk (minor misses can cost days)
Put inspections as tasks with clear predecessors and successors:
- Rough MEP inspection → insulation
- Insulation inspection → drywall
- Final inspection → turnover
Also schedule your internal “pre-inspection walk” as a task. That’s how you reduce re-inspections.
Pro Tip: Add a recurring weekly task: “Inspection requests due” with a deadline to keep the pipeline moving.
Long-lead procurement (schedule the supply chain, not just labor)
Procurement lead times can drive the critical path more than labor. Common long-lead items include:
- Switchgear and panels
- Mechanical equipment
- Specialty doors/hardware
- Windows and glazing
- Custom millwork
- Specialty finishes
Add procurement as a mini-sequence:
- Submittal sent
- Submittal approved
- Release for fabrication
- Fabrication duration
- Delivery
- Install readiness (space cleared, access available)
Then link “Delivery” to the install task. If delivery slips, the schedule should show the impact automatically.
Pro Tip: If it must be fabricated, it must be scheduled—approval and fabrication are real time.
Subcontractor handoffs (make the handoff visible)
Subcontractor coordination breaks down at boundaries:
- Framing to MEP rough
- MEP rough to drywall
- Flooring to trim
- Final clean to final inspections
Your Gantt chart should include “handoff buffers” where needed:
- Area release (zone ready) milestone
- Above-ceiling inspection sign-off before closing
- Material staged milestone before install starts
These don’t have to be long tasks—but they must exist.
Pro Tip: Add “Area Ready” milestones for each zone. Trades respect a clear release point.
Weather, site access, and constraints (plan for what you can’t control)
Weather and access can ruin a schedule if you pretend they don’t exist. Practical steps:
- Add weather buffers in exposed phases (sitework, envelope)
- Schedule alternative indoor work where possible
- Plan access windows for deliveries and crane picks
- Include shutdown windows or neighbor restrictions as constraints
You’re not predicting the future—you’re reducing the schedule’s brittleness.
Pro Tip: Put weather-sensitive work in the schedule with a visible buffer. Don’t hide it in optimistic durations.
Change orders and schedule impacts (build a repeatable process)
Change orders are normal. The scheduling mistake is not the change—it’s failing to capture the impact. Your process should be:
- Identify impacted tasks (demo, redesign, rework, procurement)
- Add new tasks and dependencies
- Compare baseline schedule vs live schedule
- Communicate the variance clearly (what moved, why, and by how much)
Even small changes can trigger inspection rework and material lead-time changes.
Pro Tip: Add one task called “Change Order Review (Schedule Impact)” whenever a change enters discussion. It forces discipline early.
How to use a Gantt chart during execution (weekly rhythm that actually works)
Building the schedule is only half the job. The real value of Gantt charts in construction management is how you use them to run weekly execution: updates, lookaheads, coordination, and problem-solving.
Weekly schedule updates (keep it simple and consistent)
Pick a schedule update day and protect it. Weekly updates should include:
- Actual start/finish dates for tasks completed
- Percent complete on active tasks
- Revised finish dates where slippage is real
- Notes on constraints (RFI pending, inspection booked, material delayed)
Don’t rewrite the schedule every week. Update reality, then adjust what must adjust.
Pro Tip: If you only have 30 minutes, update: (1) milestones, (2) critical path tasks, (3) next two weeks. Everything else can wait.
Lookahead schedules (2-week and 6-week)
Your master Gantt chart sets the plan. Your lookahead makes it buildable. A lookahead schedule is a near-term plan that focuses on:
- Upcoming tasks
- Constraints to remove
- Trade readiness
- Material staging
- Inspection bookings
Use:
- 2-week lookahead for daily coordination and constraint removal
- 6-week lookahead for procurement, submittals, and upcoming trade stacking
The lookahead should tie back to the master schedule. If your lookahead doesn’t match the master plan, one of them is wrong.
Pro Tip: Lookahead meetings are not “what are you doing?” meetings—they are “what is blocking you?” meetings.
Percent complete tracking (make progress measurable)
Percent complete is useful when it reflects measurable work. Avoid vague percentages like “about 80%” unless you define what 80% means.
Better methods:
- Quantity-based: 8 of 10 rooms roughed in = 80%
- Zone-based: Area A complete, Area B half complete
- Checklist-based: 12 of 15 punch items done
Track percent complete on tasks that run longer than a week. For short tasks, just mark them done with actual dates.
Pro Tip: Don’t let percent complete hide problems. If a task is “90%” for two weeks, it’s not a percent—it’s a warning.
Integrating RFIs and submittals (conceptual, but critical)
RFIs and submittals are schedule drivers because they control decisions and fabrication. You don’t need to build a complex system—just ensure your schedule reflects key decision points:
- Submittal required date (by trade)
- Owner selection deadlines
- RFI response needed by date
- Release for fabrication milestone
Then, during weekly updates, check:
- What’s overdue?
- What is it blocking?
- What is the workaround?
Pro Tip: Add a milestone called “All long-lead submittals approved” and link it to fabrication/delivery tasks.
Baseline schedule vs live schedule (and why it prevents confusion)
A baseline schedule is the snapshot of your plan at the start of execution. Your live schedule is what you update weekly as reality unfolds.
Here’s why the distinction matters:
- The baseline gives you a reference point for accountability
- The live schedule gives you a tool for coordination and forecasting
- Together, they show schedule variance clearly
Practical rules:
- Baseline once the schedule is accepted and commitments are real
- Don’t overwrite the baseline—save it
- Track key milestone variance: planned vs actual
- Document major drivers: procurement delays, inspection delays, change orders, access constraints
If a stakeholder asks, “Are we behind?” you answer with dates, not feelings:
- “Baseline substantial completion was Week 20. Live forecast is Week 22 due to delayed equipment delivery and re-inspection.”
Pro Tip: Keep a short “variance log” that lists: What changed, when, why, and what it impacts.
Common mistakes to avoid (and what to do instead)
Most schedule problems aren’t caused by one big failure—they’re caused by repeated small habits that weaken the plan. Here are the mistakes I see most often when teams start using Gantt charts for construction project planning.
Mistake 1: Too much detail (or too little detail)
Too much detail: 300+ tasks for a small job, updated inconsistently.
Too little detail: “MEP Rough – 4 weeks” with no inspections, no zones, no handoffs.
What to do instead:
- Schedule at the work package level
- Break long tasks into zones or measurable segments
- Keep the master schedule readable and use lookaheads for detail
Pro Tip: If your weekly meeting spends 20 minutes scrolling, your schedule is too detailed for that audience.
Mistake 2: Missing dependencies (everything floats)
If tasks aren’t linked, the schedule won’t behave logically. You’ll move one task and nothing else adjusts—so delays hide until it’s too late.
What to do instead:
- Link handoffs: rough inspection → insulation → drywall
- Link procurement: delivery → install
- Link gates: permits and inspections as milestones
Pro Tip: If you can drag a task two weeks later and nothing changes, your logic is incomplete.
Mistake 3: Ignoring procurement lead times
Not scheduling procurement is one of the most expensive scheduling mistakes because it creates unavoidable downtime later.
What to do instead:
- Create procurement tasks for long-lead items
- Link submittal approval to fabrication
- Link delivery to install
Pro Tip: Ask each trade: “What must be released now to protect your install date?” Then schedule it.
Mistake 4: Not updating consistently
A schedule that isn’t updated becomes a museum exhibit—interesting, but not useful.
What to do instead:
- Update weekly on a set day
- Record actual starts/finishes
- Adjust only what reality demands
Pro Tip: A simple schedule updated weekly beats a perfect schedule updated monthly.
Mistake 5: Using the schedule as a weapon
If the schedule is used only to blame, trades stop sharing real constraints. You get fake updates and surprise delays.
What to do instead:
- Use the schedule to identify constraints early
- Focus on recovery plans and coordination
- Keep commitments clear, but keep the process collaborative
Pro Tip: In scheduled meetings, reward early warning. Late surprises are what kill jobs.
Schedule controls you should run every week (baseline, updates, RFIs, inspections, procurement)
Schedules don’t control projects—habits do. Below is a field-ready controls checklist you can use weekly.
Table 3: Schedule controls checklist
| Control area | What to check weekly | What “good” looks like |
|---|---|---|
| Baseline vs live | Milestone variance, critical tasks variance | Variance explained with dates and causes |
| Updates | Actual dates, percent complete, revised forecasts | Updates done same day each week |
| RFIs | Open RFIs impacting work, due dates | RFI constraints tied to tasks/milestones |
| Submittals | Approval status, release dates, fabrication | Long-lead approvals protected early |
| Inspections | Requests submitted, booked dates, re-inspections | Inspections treated as gated tasks |
| Procurement | Deliveries, staging, missing items | Delivery dates linked to install tasks |
| Sub coordination | Handoffs, area releases, trade stacking | Clear start windows and zone releases |
| Constraints log | Access, design issues, owner selections | Constraints assigned to owners with due dates |
| Change orders | Schedule impact tasks and logic updates | Impacts documented and communicated fast |
| Risk buffers | Weather, rework, unknowns | Buffers visible, not hidden in durations |
Pro Tip: Print this checklist and run it in every weekly schedule meeting until it becomes automatic.
Communicating schedules to owners, subs, and the field (without confusion)
A schedule is only as useful as your ability to communicate it. Different stakeholders need different views of the same plan.
Owner updates (milestones, not micro-tasks)
Owners usually care about:
- Key milestones and deliverables
- Decisions and approvals needed by dates
- Forecasted completion and what threatens it
Give owners a milestone view:
- Permit approval
- Dry-in / weather tight
- Rough inspections complete
- Substantial completion
- Turnover
Then include 3–5 risks with mitigation actions.
Pro Tip: If you present the full schedule, highlight only milestones and critical path tasks—otherwise it becomes noise.
Subcontractor coordination (handoffs and readiness)
Subs need:
- Start windows and area releases
- What must be done before they arrive
- What they must complete before the next trade
Use a coordination view by zone/area:
- “Area A framing complete” milestone
- “Area A rough inspections complete” milestone
- “Area A drywall start” task window
Pro Tip: Trades coordinate better when they see handoffs, not just dates.
One-page milestone views (for the trailer wall)
A one-page view should include:
- Major milestones with dates
- Current week + next two weeks
- Key constraints and owners
This is how you keep the schedule alive on site.
Pro Tip: If the schedule isn’t visible in the field, the field will run on memory—and memory is not a system.
Tools you can use (from spreadsheets to scheduling software)
You don’t need expensive tools to start. The right tool is the one your team will actually use consistently.
Spreadsheets (fast, accessible, and surprisingly effective)
A spreadsheet-based Gantt can work well for small projects:
- Tasks in rows
- Dates across columns
- Bars using formatting
- Dependencies tracked manually (or with simple logic notes)
Use spreadsheets when:
- The project is small
- Your team needs simplicity
- You can maintain discipline around updates
Pro Tip: In spreadsheets, track dependencies in a “Predecessor” column even if you can’t auto-calculate. It forces sequencing discipline.
Lightweight Gantt tools (quick visuals)
Lightweight tools can create cleaner visuals and easier sharing. They’re useful when:
- You need quick stakeholder views
- You want easy drag-and-drop adjustments
- You aren’t running full CPM analysis
Construction PM tools and scheduling software (generic mentions)
For more complex projects, scheduling software (MS Project, Primavera, and similar platforms) can help with:
- Logic-based scheduling
- Float calculations
- Baselines and variance tracking
- Resource loading and reporting
The tool matters less than the method. A great scheduler can run a clean schedule in many platforms. A messy approach stays messy in the most expensive software.
Pro Tip: Upgrade tools only after you’ve built habits: baseline discipline, weekly updates, and dependency accuracy.
Resource loading in the real world (labor, equipment, and trade stacking)
Resource loading sounds technical, but the concept is simple: do you have the people and equipment to execute what the schedule assumes?
Start with labor:
- Identify peak weeks by phase (framing peak, MEP peak, finishes peak)
- Confirm subcontractor crew availability for peak weeks
- Watch for unrealistic overlap (three trades in one small area)
Then equipment:
- Lifts, forklifts, cranes, specialty tools
- Shared equipment across projects
- Access and staging for equipment use
If you can’t fully resource-load, do a simplified check:
- List top 10 resource-heavy tasks
- Ask each trade for crew size and duration
- Compare overlaps and adjust sequencing if needed
Pro Tip: When multiple trades fight for the same space, the schedule needs zoning or shift planning—not wishful overlap.
Schedule risk management (buffers, what-ifs, and recovery planning)
Risk management isn’t a separate document—it belongs inside your scheduling habits. Common schedule risks include:
- Permits and inspections delays
- Procurement disruptions
- Weather and site access
- Hidden conditions (demo and sitework)
- Change orders and design revisions
- Subcontractor availability shifts
Practical risk steps:
- Add visible buffers around high-risk milestones
- Build alternative sequences (what can proceed if a material is delayed?)
- Keep a constraints log tied to schedule tasks
- Run “what-if” scenarios when major risks appear
If a delay happens, recovery planning should answer:
- What can we overlap safely?
- What can we resequence?
- What requires added crews (and is it realistic)?
- What milestones must be protected?
Pro Tip: A recovery plan without resource confirmation is just a new fantasy schedule.
30/60/90-day scheduling maturity plan (small teams)
If you’re a small firm or a new PM building scheduling discipline, don’t try to become a scheduling department overnight. Build capability in phases.
First 30 days: Standard templates + baseline habit
Focus:
- Standard schedule template by project type
- Consistent WBS phases and naming
- Baseline discipline
Actions:
- Create a repeatable task library (phases + typical tasks)
- Add standard milestones (permits, inspections, substantial completion)
- Baseline every project schedule after kickoff
- Set a weekly update day and stick to it
Deliverables by Day 30:
- One standard Gantt template your team uses
- Baseline vs live schedule practice on active jobs
- A simple variance log format
Pro Tip: If you only change one habit this month, make it the weekly update rhythm.
Days 31–60: Lookaheads + dependency discipline
Focus:
- Lookahead schedules (2-week and 6-week)
- Better task dependencies (FS/SS/FF where appropriate)
- Constraint removal process
Actions:
- Create a 2-week lookahead view tied to the master schedule
- Start a constraints log with owners and due dates
- Add procurement mini-sequences for long-lead items
- Standardize inspection tasks and booking lead times
Deliverables by Day 60:
- Weekly lookahead meetings with trades
- More reliable handoffs and fewer surprise stoppages
- Procurement and inspection gates visible in the schedule
Pro Tip: Lookahead planning is where schedules turn into production.
Days 61–90: Metrics + risk buffers + better reporting
Focus:
- Schedule metrics that matter
- Risk buffers and what-if planning
- Clearer reporting for stakeholders
Actions:
- Track schedule variance on 5–10 key milestones
- Track percent complete on major active tasks weekly
- Add risk buffers intentionally (not hidden)
- Produce a one-page milestone report for stakeholders
Deliverables by Day 90:
- Repeatable schedule reporting pack (milestones, variance, risks)
- Better forecasting and fewer last-minute scrambles
- A scheduling culture that trades can trust
Pro Tip: Trust is a scheduling asset. When trades trust the schedule, they plan labor better—and the project flows.
FAQs
Q1) What is a Gantt chart in construction management?
Answer: A Gantt chart in construction management is a visual timeline that shows project tasks, durations, and sequencing. It helps teams see when each phase starts and finishes, where milestones occur (like inspections), and how trade handoffs fit together so the project schedule is understandable and controllable.
Q2) How do I create a construction schedule with a Gantt chart?
Answer: Start by defining scope and building a simple WBS, then list tasks by phase, estimate realistic durations, add dependencies, and include key milestones like permits and inspections. Finally, resource-check the plan, baseline the schedule, and update it weekly so it remains a live control tool.
Q3) What’s the difference between Gantt and CPM scheduling?
Answer: A Gantt chart is a visual format for presenting a schedule. CPM is a calculation method that uses dependencies to identify the critical path and float/slack time. You can display a CPM schedule as a Gantt chart, but a basic Gantt doesn’t automatically provide CPM analysis unless the logic and tool support it.
Q4) How do dependencies work in a construction Gantt chart?
Answer: Dependencies connect tasks so the schedule reflects real sequencing. The most common is Finish-to-Start (FS), like “rough inspections must finish before insulation starts.” Start-to-Start (SS) and Finish-to-Finish (FF) can model overlaps, but should be used carefully to avoid unrealistic stacking.
Q5) How often should I update a construction schedule?
Answer: Weekly updates are the practical standard for most projects. Update actual start/finish dates, percent complete for active work, and revise forecasts where needed. If the job is fast-moving or high-risk, you may also do quick mid-week checks for the next two weeks of work.
Q6) What are the most important milestones to include?
Answer: Common high-value milestones include permit approval, foundation pour, framing complete, dry-in/weather tight, rough inspections complete, substantial completion, final inspections, and turnover. Include any milestone that gates work, triggers payments, or requires coordination with external parties.
Q7) How do I handle delays and change orders in a Gantt chart?
Answer: Add the change as new tasks (demo, redesign, rework, procurement) and connect them with dependencies to impacted work. Compare baseline schedule vs live schedule to show schedule variance, and communicate what moved and why using dates—not opinions.
Q8) Can I make a Gantt chart in a spreadsheet?
Answer: Yes. Many small teams build effective schedules in spreadsheets using task lists, date columns, and formatting to show bars. The key is to keep dependencies visible (even if manual) and maintain a consistent weekly update process.
Q9) What’s a lookahead schedule and how does it relate to a Gantt chart?
Answer: A lookahead schedule is a near-term plan (often 2-week or 6-week) pulled from the master Gantt chart and focused on readiness and constraints. The master shows the overall plan; the lookahead ensures upcoming work is buildable by removing blockers like RFIs, materials, and inspections.
Q10) How detailed should my construction Gantt chart be?
Answer: Detailed enough to manage handoffs, inspections, and procurement—but not so detailed it becomes impossible to update. If tasks run longer than two weeks, consider breaking them into zones or measurable segments. Use lookaheads for finer detail rather than bloating the master schedule.
Q11) What is float/slack time and should I track it?
Answer: Float (slack time) is how much a task can slip without affecting the project finish date. Tracking float helps you understand where you have flexibility and where you don’t. On complex jobs, float awareness is critical; on smaller jobs, a simple “what does this impact?” habit still captures the benefit.
Q12) How do I schedule permits and inspections without constant rework?
Answer: Treat permits and inspections as tasks and milestones, include booking lead times, and schedule internal pre-inspection checks. Build re-inspection risk into buffers and keep an inspection request routine so you aren’t scrambling when work is ready.
Q13) What should I do when subcontractor availability changes?
Answer: Update the live schedule immediately, then resequence where possible: shift work to available areas, adjust handoffs, and confirm revised start windows with impacted trades. Use the lookahead schedule to prevent stacking trades in the same space and to keep constraints visible.
Q14) How do I show progress tracking and percent complete clearly?
Answer: Use measurable percent complete methods: quantities, zones, or checklists. Avoid vague estimates that linger at “90%.” Record actual dates when tasks finish, and track schedule variance on key milestones to keep reporting objective.
Q15) What’s the fastest way to improve scheduling on small teams?
Answer: Standardize a template, baseline every job, update weekly, and run lookahead meetings focused on constraint removal. Those habits create reliable schedules faster than switching software or adding complexity.
Conclusion
Using Gantt charts for construction project planning works when you treat the schedule like a production tool: build it from real scope, connect tasks with real logic, include inspections and procurement, baseline it, and update it consistently. That’s how you turn a timeline into control.
In 2026, the teams that schedule well aren’t the ones with the most complicated software—they’re the ones with the cleanest habits: clear sequencing, disciplined updates, proactive constraint removal, and honest reporting. Start with a Gantt chart you can maintain, then add CPM discipline where complexity demands it.